
Top 7 Pruning Systems: Pollarding, Bonsai, Espalier, and More
For a gardening novice, pruning may only conjure images of a pair of sharp shears and a few snips. But for experienced gardeners, pruning is an art form with many types.
The seven pruning systems include natural pruning, topiary pruning, pollarding, espalier pruning, pleaching trees, fruit tree pruning, and bonsai pruning. That's a lot to keep up with, right?
Worry not. We'll explain these pruning systems in the guide below. Keep reading to learn about different types of pruning techniques, their benefits, and when they're used.
Table of Contents
Top 7 Pruning Systems and Techniques For Trees
Pruning techniques differ from each other based on the type of tree, desired shape, and the amount of pruning needed. Here are seven commonly used turning systems.
Natural Pruning
Natural pruning is the simplest form of pruning. Think: removing old or weak branches and trimming overgrown branches or foliage.
The goal of natural pruning is quite simple: giving the tree to its natural shape. It has got nothing to do with giving the tree a specific shape.
Purposes of Natural Pruning
As mentioned, the purpose of natural pruning is primarily maintenance rather than aesthetics. Here are some reasons to use this pruning technique:
- Removing diseased, dead, or damaged branches
- Shaping the tree
- Promoting healthy growth by removing branches to redirect the plant's energy toward other areas
- Controlling a plant's size, especially in urban areas with limited space
Techniques and Tools for Natural Pruning
The technique for natural pruning is simple. All you have to do is remove specific leaves and branches from the tree. In this technique, you leave most of the tree intact. Some techniques used in natural pruning are:
- Heading Back: You cut back the tips of the tree branches. It encourages lateral growth and helps give the tree a good overall shape.
- Thinning: You remove individual stems or branches to improve the tree's structure. It also helps encourage growth by allowing light penetration.
- Raising: In this technique, you remove the lower branches of the tree to increase clearance for buildings, vehicles, and pedestrians. For example, street trees are often raised so that they do not cause obstruction for passing cars.
You don't necessarily need a lot of tools for natural pruning. Here are some standard must-haves:
- Hand pruners to remove smaller stems and branches
- Loppers to cut thick branches
- A pruning saw for larger branches
- Pole pruners to reach higher branches without a ladder
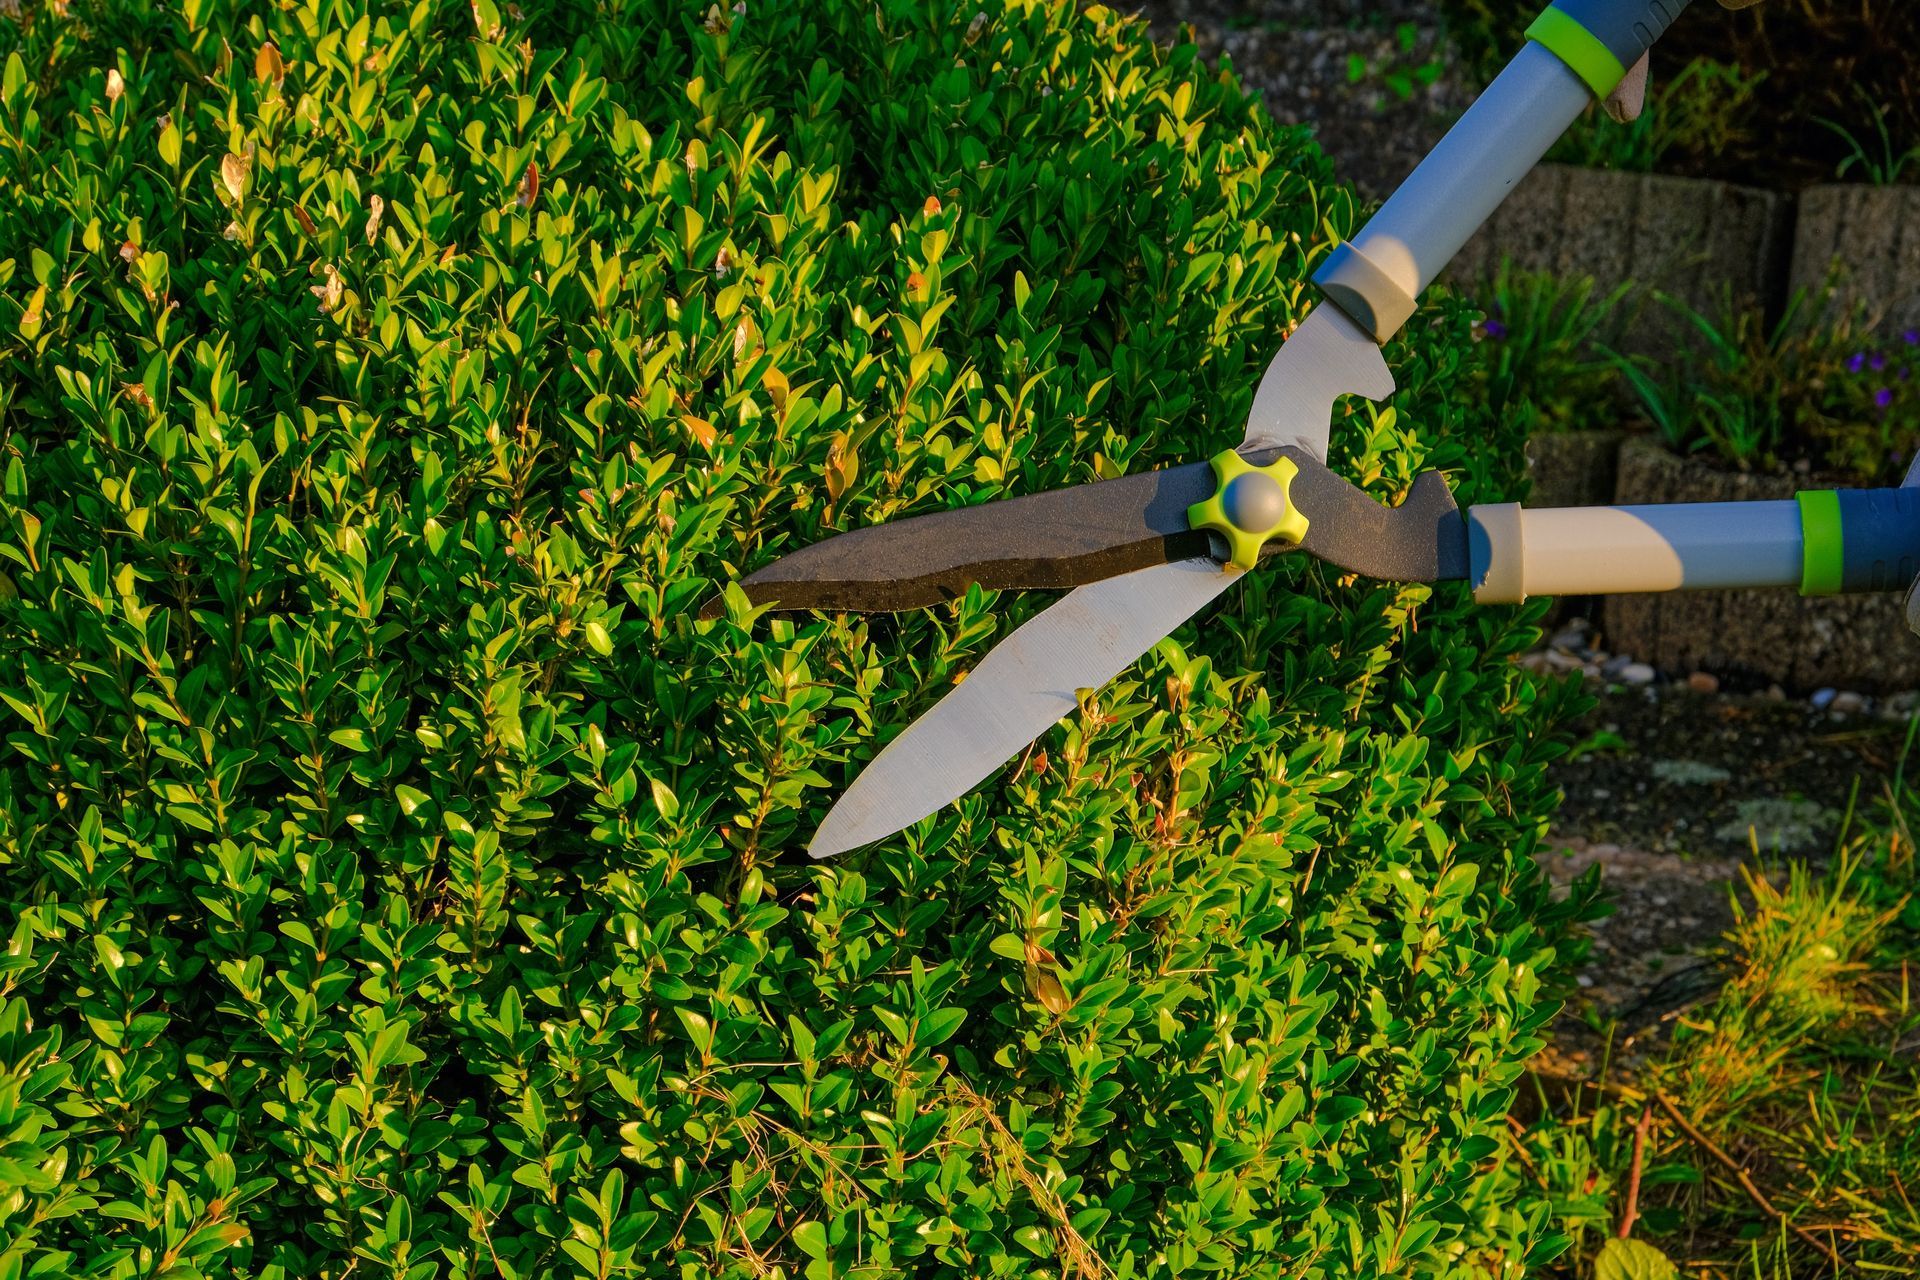
Topiary Pruning
In horticulture, topiary is the practice of clipping the twigs and leaves of trees, subshrubs, and shrubs. It trains perennial plants to grow in a clearly defined shape, often fanciful or geometric.
Unlike natural pruning, topiary pruning is rarely done for street trees. Instead, it is common in private gardens and public spaces with an aesthetic appeal. Sometimes it's done for front yard trees on more debonair landscapes.
The practice of topiary pruning dates back to Egyptian gardens. Today, it is used in formal garden design to make outdoor spaces elegant.
In this technique, the gardener selects plants based on their characteristics. For example, plants with small leaves or a dense growth habit are ideal for this pruning system.
The gardener then prunes the plant and shapes it over time. Regular maintenance makes the plant take the desired shape, such as circular or conical.
Techniques and Tools for Topiary Pruning
The techniques a gardener uses for topiary pruning depend on the shape they want the plant to take. But here are some common techniques.
- Trimming: It involves using pruning scissors or shears to cut the leaves per the desired length. Trimming creates a specific plant shape and helps remove weakly attached branches.
- Pinching: The gardener may use their fingers to remove new growth from the plant. It encourages branching and makes the topiary appear bushy.
- Wiring: In this technique, the gardener guides a plant's growth with a wire. They wrap the wire around the plant's branches, twisting and bending them to create the desired shape.
- Cloud Pruning: It involves creating a cloud-like and round shape by pruning the leaves selectively. The gardener will cut back the outer edges but leave the center as it is. Cloud pruning is most commonly done for shrubs.
Besides the tools needed for natural pruning, topiary pruning also requires additional tools.
- Hedge shears to trim the topiary's outer edges and give the foliage a certain shape
- Secateurs to cut thinner stems and branches
- Wire cutters to cut and bend the wire
- Topiary frames to guide a plant's growth
Pollard Pruning (Pollarding)
Pollard pruning or tree pollarding is a technique in which the upper branches of a tree are removed, leaving the lower branches and the trunk. In most cases, gardeners repeat this process periodically, every one to three years.
Pollard pruning aims to create a tree with a manageable size and growth. Gardeners have been pollarding trees for centuries, especially in Asia and Europe.
Pollarding is common for oak trees, planes, and willows. The Royal Horticultural Society's list of commonly pollarded trees includes the following:
- Ash (Fraxinus)
- Common lime (Tilia × europaea)
- Elm (Ulmus)
- Elder (Sambucus)
- Gum (Eucalyptus)
- Some species of Acer (A. negundo and its cultivars)
- Tulip tree (Liriodendron)
- London plane (Platanus × hispanica)
- Mulberry (Morus)
- Oak (Quercus)
Pollard Tree Pruning Technique and Tools
Now that you know what is pollarding trees, let's look at the technique.
- Initial Pollarding: The overgrown pollarded tree is pruned in the first step. Its branches are cut to the desired height.
- Regular Pollarding: After the initial pollarding, the pollard trees will grow new branches every year from the pruning cut points. The gardeners allow these branches to grow for some years. After a while, they cut these branches to the same height as the initial pollard trees.
- Maintenance: If any new growth happens during the year, it is pruned to ensure the tree retains its shape.
The pollard tree pruning technique requires a pruning saw, loppers, pole saw, and chainsaw. Pollard pruning should only be done by a professional gardener or arborist.
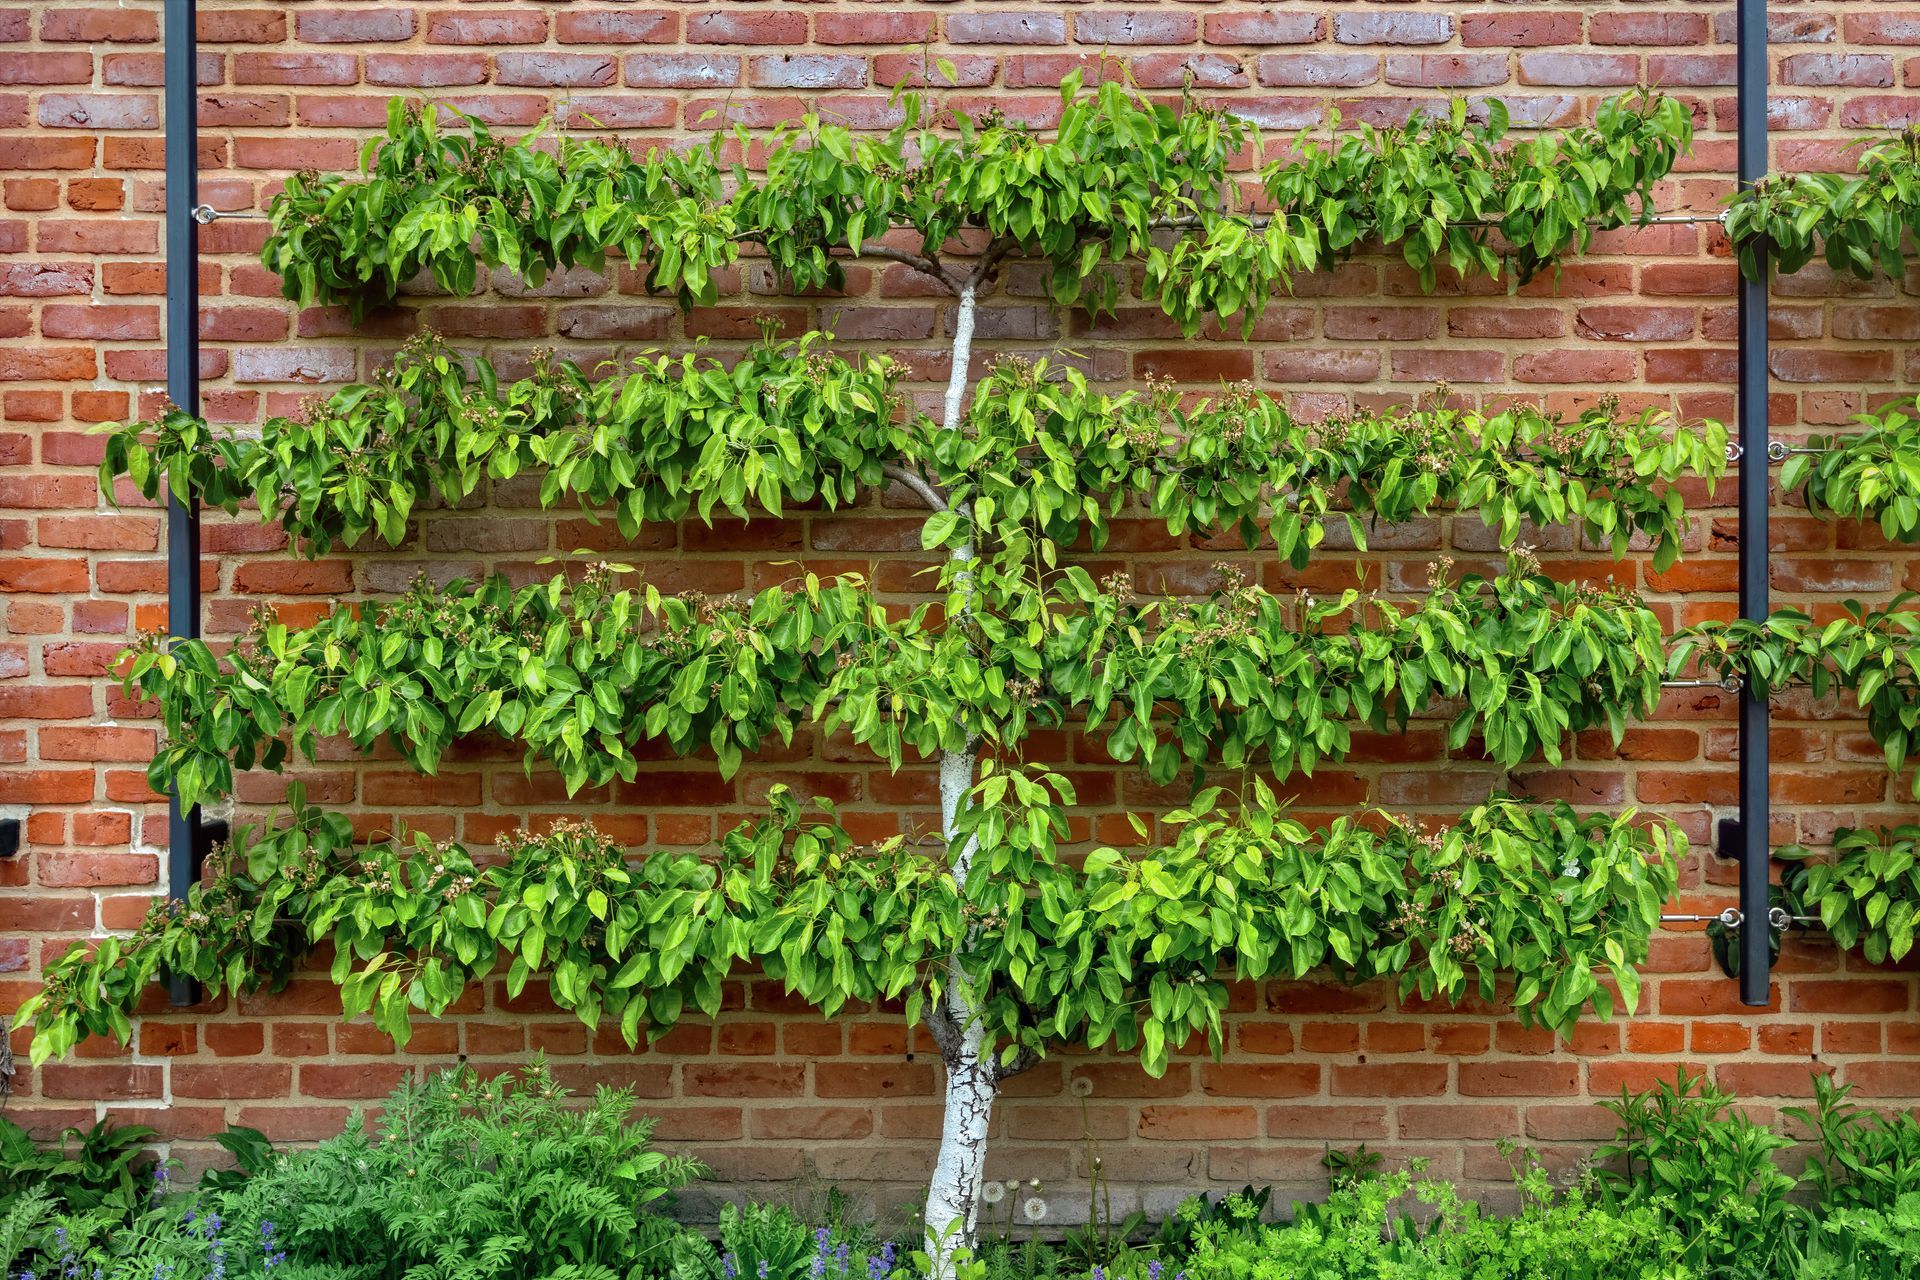
Espalier Pruning
Espalier pruning is a pruning system for ornamental plants and fruit trees. In this technique, the plants are pruned and trained so that they grow flat against a fence or a wall instead of upright in their natural form.
'Espalier' is taken from the French word 'Espallier,' which translates to 'supporting with a shoulder.' The technique lets gardeners save space in their gardens and create beautiful plants that bear fruits.
There are many types of espalier pruning, including the following:
- Cordon: The gardener trains the plant to grow along one trunk or stem. Meanwhile, the branches are spaced along the main stem evenly. The cordon style is typical for fruit trees like pears and apples. It makes fruit harvesting and production a breeze.
- Fan: In this style, the gardener trains the branches to grow outward from the main stem. The branches grow in a fan shape. It's a standard style for plums and peaches to create a decorative effect.
- Palmette: In this style, the branches grow in a tiered and horizontal pattern to create flattened layers.
- Diamond: The style involves a diamond-shaped pattern growth in which branches cross each other at 90-degree angles. Diamond-styled pruning is standard in ornamental plants like roses.
- Belgian Fence: The gardener trains multiple trees to form a lattice-like effect with criss-cross growth. Most gardeners do this with cherry and apple trees.
Espalier Pruning Technique
The proper espalier pruning technique is an ongoing process. You need to prune the fruit tree two to three times every season to keep it in shape. The initial pruning is done after the first bloom in spring.
Look at the flowers to see where the fruit will grow and prune accordingly. It usually takes around four years to get the desired shape of the fruit trees.
Creating An Apple Espalier
Suppose you want to create an apple espalier. Here's the technique for it:
- Start with a sapling of 2 to 3 feet. It should not have any side branches and must be very pliable.
- Choose a trellis or a wall and place four rows of galvanized wire on it. There should be a 2-foot distance between each wire.
- Plant a 3-foot sapling or whip in the middle of this structure.
- Locate the lowest bud on this sapling and remove the wood above it. Make sure the bud is 2 feet from the sapling's base and aligns with the lowest wire in the structure.
- Let lateral branches grow away from this cut over time. Once you see growth, tie a bamboo cane to the branch and the wire. One end of the cane should be tied to the young branch and the other to the first horizontal wire.
- Pull the branch toward the wire to make it grow along it. The branches usually take two growing seasons to grow at a 90-degree angle to the main trunk.
- When the sapling starts to grow to the second horizontal line, make another cut above the bud. Then, attach the new lateral branches to the wires.
- Keep repeating this until the espalier has three or more sets of horizontal branches and a height of 6 to 8 feet.
Patience is key for the espalier pruning technique. You might even have to cut the fruit for the first season to ensure the proper shape of the tree.
Pleaching Trees
According to the Royal Horticultural Society, pleaching is a practice of training trees to produce a narrow hedge or screen. The technique involves interlacing and tying in young shoots along a horizontal framework for support. Pleaching trees has long been used to make arches, tunnels, arbors, and walls.
The gardener removes a tree's side branches up to a specific height. They leave the main branches intact but train the remaining branches to grow diagonally or horizontally.
While some people may confuse the two, espaliers are not the same as pleached trees. The former have horizontal branches with regular space intervals between them. But pleached trees have a central stem with horizontal branches close to each other.
Often, the branches are twisted into neighboring trees.
If you plan to plant trees for pleaching, make sure they are 1.5 meters apart. It will give the tree enough space to grow its crown. Spacing the trees also helps prevent large root systems.
If there's a nearby building or fence, make sure the tree is planted 40 cm away.
How To Pleach Trees
The right time to plant a pleached tree is October or November. By this time, the ground has received the autumn rain. The soil is also warm enough to ensure the trees thrive before winter arrives.
There's no need to worry if you've missed the October mark. If the plant is pot-grown, you can plant it at any time of the year. Just make sure the soil isn't frozen. Meanwhile, bare-root trees can be planted from November to March.
Here's how to pleach trees:
- Create a framework for training your trees before you plant them. To do this, set up a stout stakes row - one row for one tree - and drive them into the ground to 60 to 100 cm depth.
- Attach a wire, wood batten, or bamboo frame to the stout stake. The lowest part of your frame should be the same height as the height you want for the clear stem. Meanwhile, the top height of the structure should be the height you wish the tree to take.
- Plant young trees close to the stakes in early winter or fall.
- Tie the lateral and leader branches to the frame. If any stems interfere with the clear stem's growth, prune them.
- In early spring and other parts of the growing season, prune out more shoots you cannot train to grow sideways. Also, tie the young stems to the frame horizontally.
- When the central shoot or the leader gets tall enough, train it to grow horizontally along the wire or the wood batten.
- When winter arrives, trim the long shoots. It will encourage them to produce lateral shoots in the next season.
It usually takes five years for pleached trees to develop fully. Once that happens, you can remove the wire or bamboo framework.

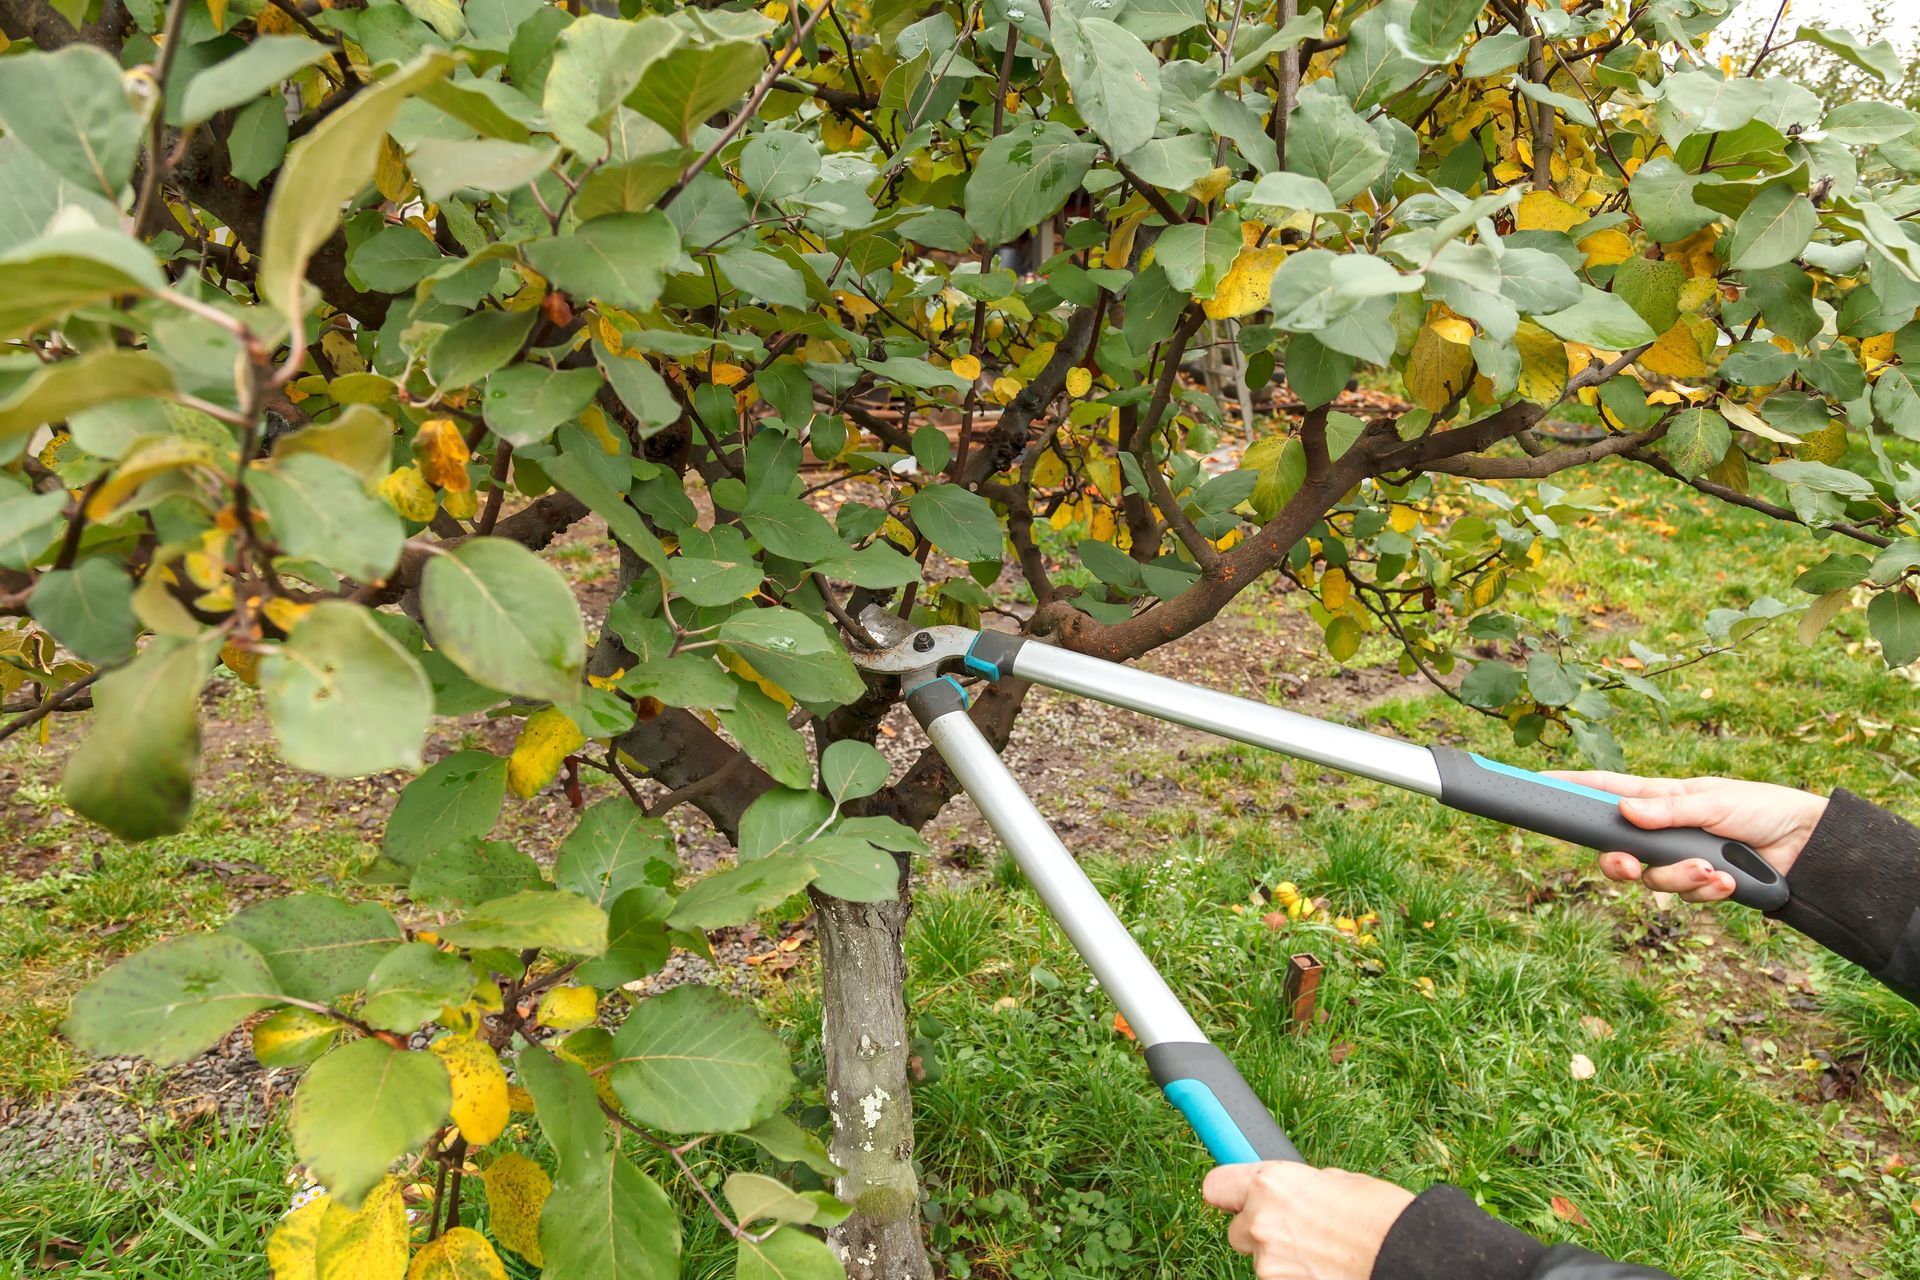
Fruit Tree Pruning
Fruit tree pruning means removing branches from a fruit tree to improve its productivity, health, and structure. Pruning helps mature trees produce more and better quality fruit, and it can also help direct the growth of young trees to form a desired shape and encourage new growth.
When pruning a fruit tree for new growth or structure, keep the following factors in mind.
- Timing: You should prune fruit trees during the dormant season, such as early spring or later winter. During this period, the tree can focus on using its energy to heal rather than create new branches and leaves.
- Tools: Use sharp tools, such as loppers and pruning shears, to prune fruit trees. When pruning young trees, disinfect your tools to prevent the spread of insects or diseases.
- Technique: Follow proper tree pruning techniques to give clean cuts to promote healthy growth. It's best to cut at 45 degrees above a branch junction or a bud. Do not leave stubs on the tree.
- Balance: It's essential to balance vegetative growth and fruit-bearing wood. Remove three or five branches growing in the wrong direction, crossing over neighboring branches, or rubbing with a nearby power line or fence. Prune excessive growth to thin out crowded areas, especially in large trees.
Fruit Tree Pruning Technique and Tools
The right time and pruning technique for fruit trees depends on their type. For example, you should prune mango trees after fruit harvest before mid-December. Remove dead branches or any limbs touching the ground or crossing each other. Vertical branches on a mango tree should also be removed because they are unproductive.
Meanwhile, apple trees can be pruned at any time during the year. But the best time is before spring in late winter. You should remove the following:
- Weak, narrow-angle, injured, and diseased branches
- Interfering branches
- Branches with forked limbs
- Upright branches
- Branches that sweep inward toward the tree's center
For peach trees, the right time is before they bloom in spring. Remove any branches growing downward, inward, horizontally, or vertically. Also, remove pencil-shaped branches growing down or straight up from the plant.
The red shoots and other fruiting branches should be trimmed around 18 to 24 inches of growth outward of the tree.
Unlike landscape trees or shade trees that require annual pruning, fruit trees may only need to be pruned every two or three years. Pruning young trees might be necessary annually for the first few years to help them develop well-spaced branches.
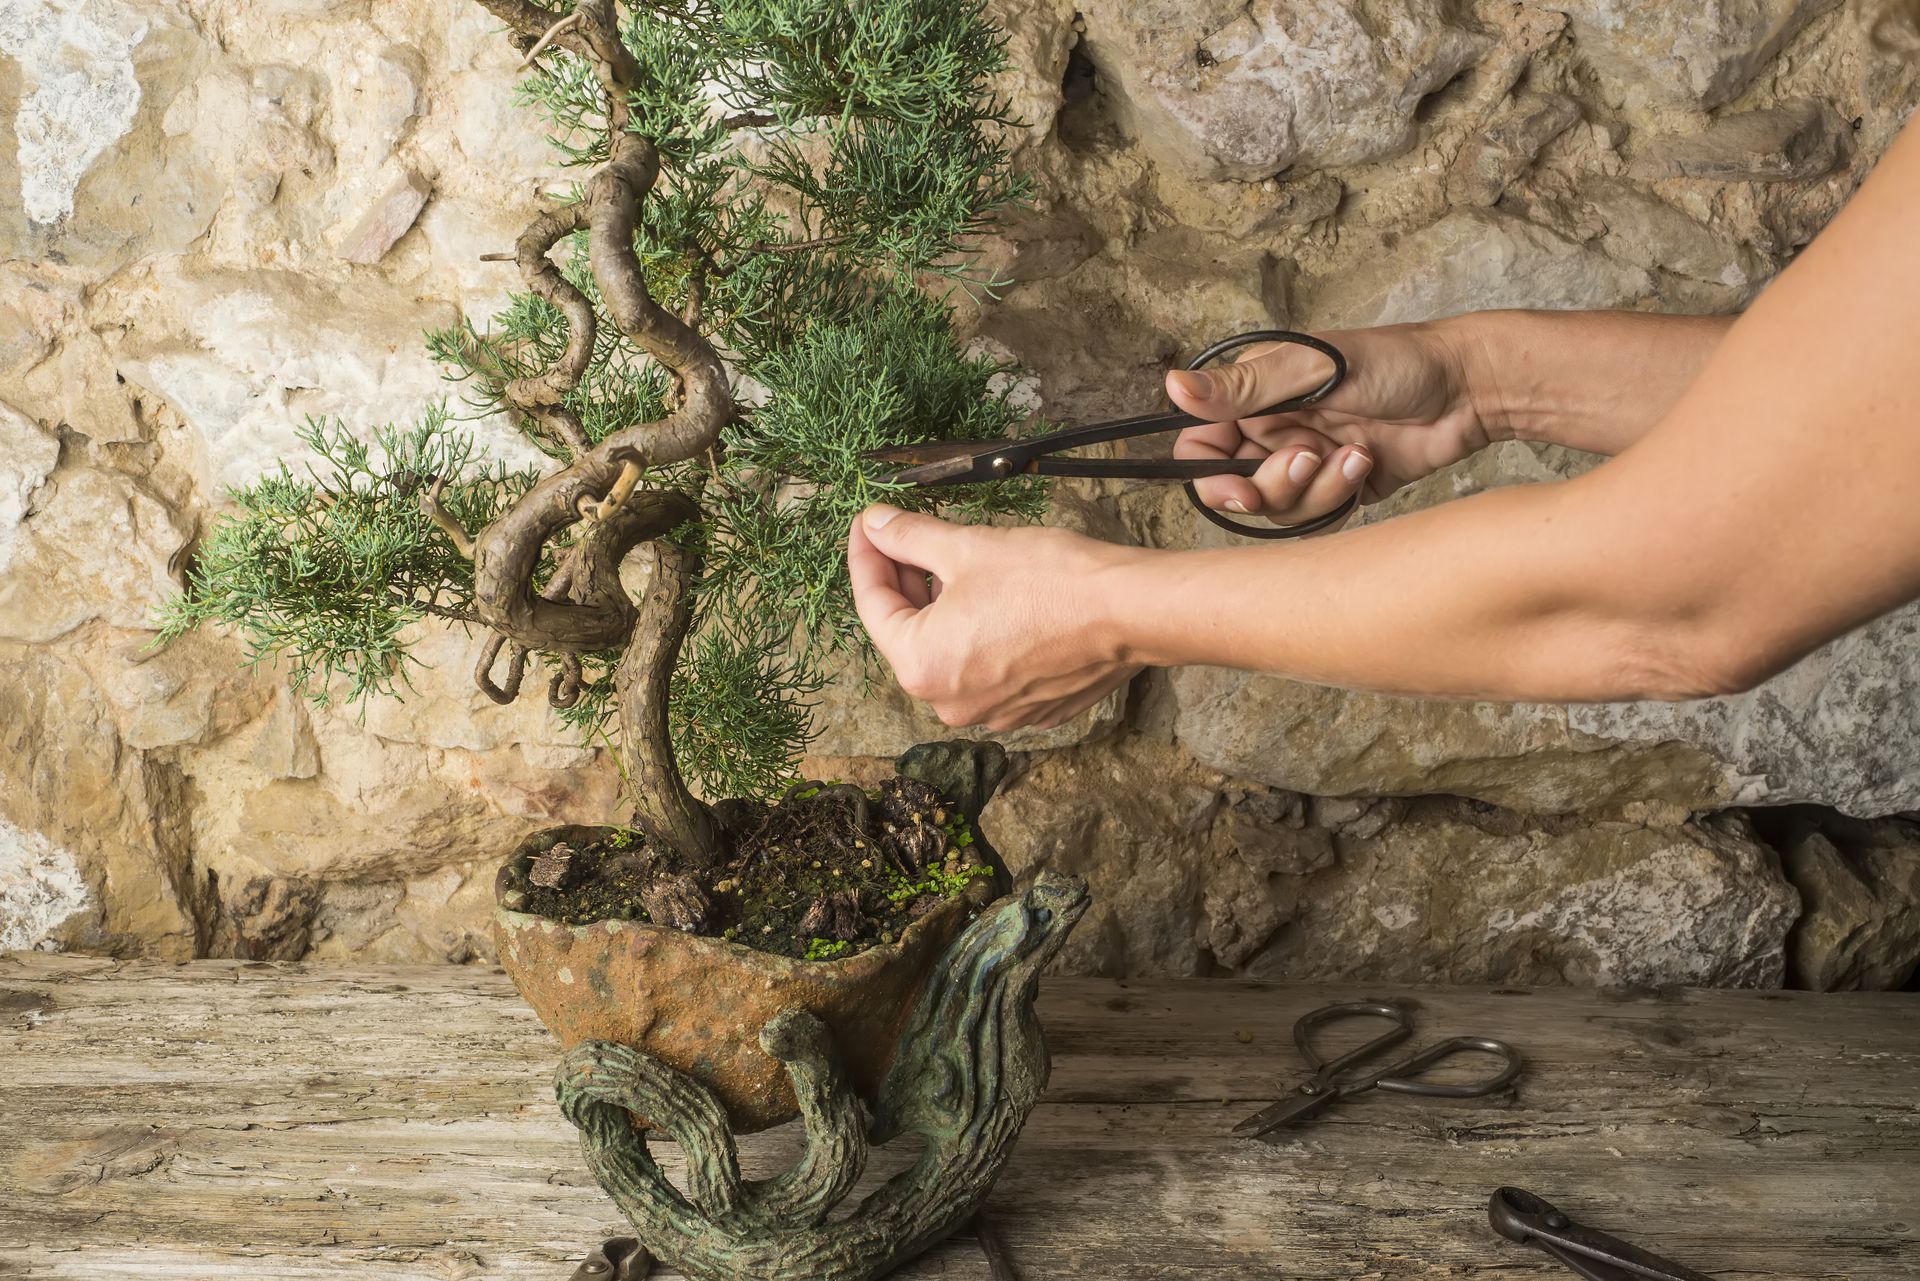
Bonsai Pruning
Bonsai tree pruning is a technique in which bonsai trees are maintained and shaped. Gardeners may use different bonsai pruning techniques, such as:
- Maintenance Pruning: It involves removing damaged and dead branches. Gardeners also remove new growth detracting from the bonsai's overall shape.
- Structural Pruning: In this type, gardeners shape the tree's structure. They remove large foliage and branches to create their desired shape.
- Pinching: It's a gentle pruning technique in which gardeners use their fingers to pinch off the tips of any new growth. It helps promote branching to give the bonsai a compact form.
Unlike large trees, bonsai don't need extensive pruning. With proper pruning, they can remain healthy and keep their desired shape.
Bonsai Tree Pruning Technique and Tools
The best time to prune a bonsai tree for style and structure is from November to February. Here's how to do it:
- Cut large branches protruding from the tree.
- Remove branches that have unnatural turns and twists.
- Cut every branch above a node where a new twig can develop.
- Thin out the tree by removing excess foliage and dead branches. Use branch cutters to remove small branches.
- Remove suckers (small offshoots growing at the base of the trunk or on the tree's branches) using your fingers.
- Remove the needles from overgrown areas by twisting them. Make sure you leave three needles on every branch.
If you're unsure or don't have the required skill, let a tree care professional handle bonsai pruning. Making the wrong pruning cuts at the wrong place at the wrong time will only damage your plant and incur additional costs in corrective pruning.
Sweet New Earth Final Say on the Many Different Pruning Techniques
As evident, there are many types of pruning systems. Each pruning technique or system has its benefits, uses, and methods. Improper pruning can harm the plant and stunt its growth. Hire a tree care professional for the more complex pruning systems.

Christina Hernandez
Christina has done most of her research on environmental science but recently has changed her focus towards sustainable forestry. She has a passion for the outdoors and wants to spread that passion to the world.
Join our community!
Join to receive guides, insights, and the latest gardening deals!